Friday, June 24, 2016

Module One, Chapter 11 Fabric and Thread

In Image 11.12, I used a pin board to weave a star shape. Image 11.13, I used mulberry fiber which I distressed and painted and 11.14 is with lutrador which I cut with a heat tool  Of these three, I like the mulberry fiber, probably because I like creating texture.

image

image

In image 11.15, painted tyvek was used and heated with an iron, then cut apart.  I added the drawn lines to create more cohesion in the piece.  11.16 is silk fiber and angelina with water soluble.  I should have used one of my paper designs as a source, but instead I just wanted to see what it would be.  Now I can’t decide if I don’t like it because of the weak design!

FullSizeRender (3)

I really didn’t like this exercise, but I am not a huge fan of drawn work either.  Really am not using this technique!!!!

Module One, Chapter 11, Paper

These are my exercises to develop my resolved piece.  First, I brainstormed ideas of the growth and distintegration of stars in my sketchbook (image one).  I also searched new sources of star images.  I went through my garden which was full of spring flowers as well as the internet for images to use for inspiration.  I decided to focus on not only traditional stars, but also starfish and star shaped flowers.

FullSizeRenderImage ONE

I then started working on paper designs.

image

In image 11.1, I used construction paper and a commercial punch and then tried to distress the form.  I really didn’t like this as I didn’t feel that it was my design.  In image 11.2, I used various ways to distress the paper.  My favorites were “wrinkled and sanded” as it had the most texture and cut apart because of the rhythm that can be achieved.  In image 11.3, machine stitching was used and then the paper was wet and rubbed and scratched to make holes.  To translate this to fabric, I thought of using water soluble, burn away with kunin felt or synthetic organza, or maybe plastic trash bags.
image

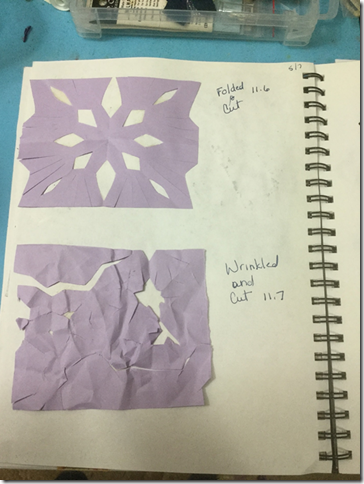
In images 11.6 and 11.7, additional ideas were tried.  It was too haphazard for me.

Next I went back to some of my earlier paper designs that I liked and started working with them.
image

image

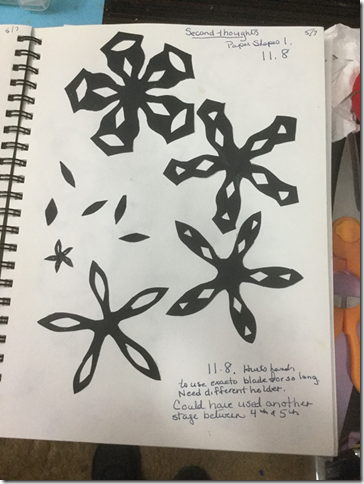
In image 11.8, I started seeing real potential.  I like seeing the design change.  In the paper exercises, I had really focused on disintegration, but now I began to see growth in the design as well.  In image 11.9, I continued with the idea of the design breaking into pieces.  I think this one has the strongest use of negative space.

image

In image 11.10, it helped me focus more on negative space.

Saturday, May 07, 2016

Chapter Ten, optional exercise

These were optional exercises for chapter 10.  I almost didn't do them because they were about burning synthetic fabric.  In the past, I loved using this technique, but never really paid strict attention to the warning and safety precautions which has caused some health issues.  I decided this was a bad excuse and it was time to work with a quality respirator! It was hard to get down to the cotton bottom layer.  It was useful to remove the top layer of synthetic fabric to leave the next layer, but hard to control and stop it from going too many layers.

Chapter Ten, Ripples

 
- it was an interesting technique, but it would need to be used with care to insure it is not gimmicky.  I once again did a basic shape as the technique would be overwhelmed.  It was really hard to get into all the points.  I left a nice size margin uncut to give the eye a rest.

Sunday, April 24, 2016

Chapter nine, module one

This was the multi colored ripple le effect reverse applique.AdobePhotoshopExpress_2016-04-24_13-06-08-0400_edited. i used some fabrics that i dyed myself using deconstruction printmaking technique that I learned in a workshop with Carol Soderlund.  i can't quite work out what i don't like about it.  my best guess is there is not a great value change in this sample.

Technorati Tags: ,

Chapter nine. Module One, machine reverse applique

AdobePhotoshopExpress_2016-04-24_13-10-07-0400_editedI am still getting back into the right frame of mind to do these samples. For this one, I used multiple layers of fabric to do reverse applique. With the multiple layers, I machine stitched a layer and cut it out and then the next until I got to the yellow center. The wacky cross stitch in yellow stranded cotton almost forms another star layer. Although it is fuller closer to the shape, I stitched an uneven stitching to break it up. I then stitched a dark blue thread over both the blue and the burgundy layers.

Chapter Nine, Module one, Reverse Applique

Technorati Tags:
37076a27-b252-48b4-a831-5dbdf2313a8f

I am finally back working on my City and Guilds course with Sian Martin after several years. I am determined to finish this by the end of next year by creating self-imposed deadlines. I spent most of last week reacquainting myself with the earlier assignments and finding all the pieces that I had completed.

Here is my sampling of reverse hand applique. I really expected this to be easy as I have done several applique quilts including a twenty block Baltimore album quilt. My first mistake was not counting the number of layers that I would need. I had thought to use the mustard yellow loose woven cotton as the base layer. I knew it would be hard to applique, and it was. I added the satin fabric to the back and did the best I could. I used the blue chain stitch to camouflage the raveling seam to some extent. The backstitch was used to emphasize the stronger outer lines. The stars in the background was to create a more interesting background without taking away from the primary design element

Tuesday, October 06, 2015

Thirty sketches in thirty days day 26!


-
I am officially on day twenty six, but I am on sketch 40! It really is getting easier., but it is really important to have a group of pictures and idea generators to be able to sit down at nine pm after a long day at work and draw. I am drawing on the coach as I watch the night late night comedy from the night before. Jimmy Fallon, Steven Colbert, and Trevor Noah make up some of the funniest television on the tube!  #inktober

Posted using BlogPress from my iPad

Sunday, October 04, 2015

Thirty sketches in thirty days - day twenty four


- using ink with a brush today. It was different and I need to keep practicing. #inktober

Posted using BlogPress from my iPad

Saturday, October 03, 2015

Thirty sketches in thirty days - day twenty three


-
Actually did this last night, but just in case... I love alliums! They are such fun flowers. The shape is is like lollipops in the garden. I used an image from Spring Hill Nurseries for my inspiration, but didn't want them to come out really realistic. It was also a challenge to create the multiples where they touched.

I committed to doing #inktober thirty day challenge which will add another 25 days to my drawing every day. I am really starting to enjoy it and not see it as quite a challenge!

Posted using BlogPress from my iPad

Friday, October 02, 2015

Thirty sketches in thirty days - day twenty two


- What is so cool is that this is actually my twenty sixth sketch! It really is getting easier. It isn't just about getting into the habit as much as developing a system that works for me and my lifestyle. I work full time and am in my last semester of an MBA program. Between these demands and my family and dogs, I don't have a lot of downtime. The big win from committing to the thirty days is that I have worked out ways to bring it into my daily routine. Before I would go into my art room, away from everyone, and make art, but then I was away from the family and the dogs. By getting a second set of pens and a few wood less pencils and kneaded eraser, I was able to keep that and a sketchbook in the family room and sketch on my lap. The second big barrier was my nice sketchbooks that I would use. Instead I bought a cheap sketchbook. As I was only doing pencil and ink, I didn't need expensive paper. I was free to make mistakes and just draw. I soon realized that the last big barrier was deciding what to draw. Sitting on the couch at nine at night, I was too exhausted to 'be creative', so I started printing out in groups of seven or eight, pictures to sketch either from my phone, images from the Internet, or this great site called Paint my Pictures.

Posted using BlogPress from my iPad


Thursday, October 01, 2015

Thirty sketches in thirty days - Day Twenty one


-
This is one of my orchids. The drawing isn't amazing probably because I drew it quickly.

Posted using BlogPress from my iPad

Day Twenty

I forgot to upload this last night. I started drawing and then realized that the pumpkin and flowers were not connected. Adding the leaning flower to try and help, at least a little.


- Posted using BlogPress from my iPad

Tuesday, September 29, 2015

Monday, September 28, 2015

Thirty sketches in thirty days


- Posted using BlogPress from my iPad

Saturday, September 26, 2015

Thirty sketches in thirty days day sixteen


- Posted using BlogPress from my iPad

Thirty in thirty - day fifteen

This is actually Friday's.


- Posted using BlogPress from my iPad

Monday, September 21, 2015

Sunday, September 20, 2015

Thirty sketches in thirty days

Drew these while watching the Emmys.


- Posted using BlogPress from my iPad

Saturday, September 19, 2015
