
Sunday, January 08, 2017
Module Two, Chapter Seven, Seminole Piecing samples


Module Two, Chapter Seven, Fabric log cabin

The log cabin pattern was one of my go-to patterns to make for gifts about 20 years ago! This is a completely different color scheme as well as purpose. It really does have some interesting possibility.
Saturday, January 07, 2017
Module Two, Chapter Seven, Pineapple Quilt

This is another quilt that I made years ago. It is called a pineapple quilt which is a variation of a log cabin quilt. Traditional log cabin quilts are probably one of the easiest and fastest quilt to make and is a great way to learn strip piecing. This pineapple quilt was done using paper foundation method.
Module Two, Chapter Seven Bargello


This is an old quilt that I finished years ago. It is a good example of strip piecing such as in this chapter. The black and white version does resemble reptile markings.

Module Two, Chapter Seven, Paper one

Here are some paper samples for paper piecing. I am originally from Florida where many of the Seminole Indians reside. Many years ago, I did some Seminole piecing. First this chapter, I refered to an old book, Basic Seminole Patchwork.
Sample one is a traditional log cabin example.
Module two, chapter six, Monoprinting on fabric 2

I decided to also try a few on black fabric with golden's zinc white with Golden's GAC 900 fabric medium. I used an old credit card and a sponge brush to create these. On the top right and bottom right, I covered the whole piece of glass with paint and scraped out areas for negative painting. The piece on the bottom left was my clean up cloth.
Friday, January 06, 2017
Module Two, Chapter six, Monoprinting on Fabric

These are my samples for monoprinting. Several in the middle row were done as ghost prints (second print) from the paper monoprinting samples. I used golden acrylic paint with GAC for fabric.
Module Two, Chapter six: Shibori Samples

These are my twelve shibori samples. I really like them for the most part. One main problem was that the black turned out to a middle to dark grey-green instead of black. I have dyed a lot in the past, but I have never done it in the winter. I usually do it outside in the sun and here in the Southeastern U.S. it is always warm in the summer. I usually dye it and then cover it with saran wrap and leave it outside for several hours. Last weekend while do these, it was very cold and I left them outside in the garage overnight. Despite using extra black dye as well as buying fresh dye to use, it didn't quite darken enough. If we have a warm spell, I might try and do some more. I think this will get me started on the next few chapters.
Module Two, Chapter Six, Shibori - roped and tied
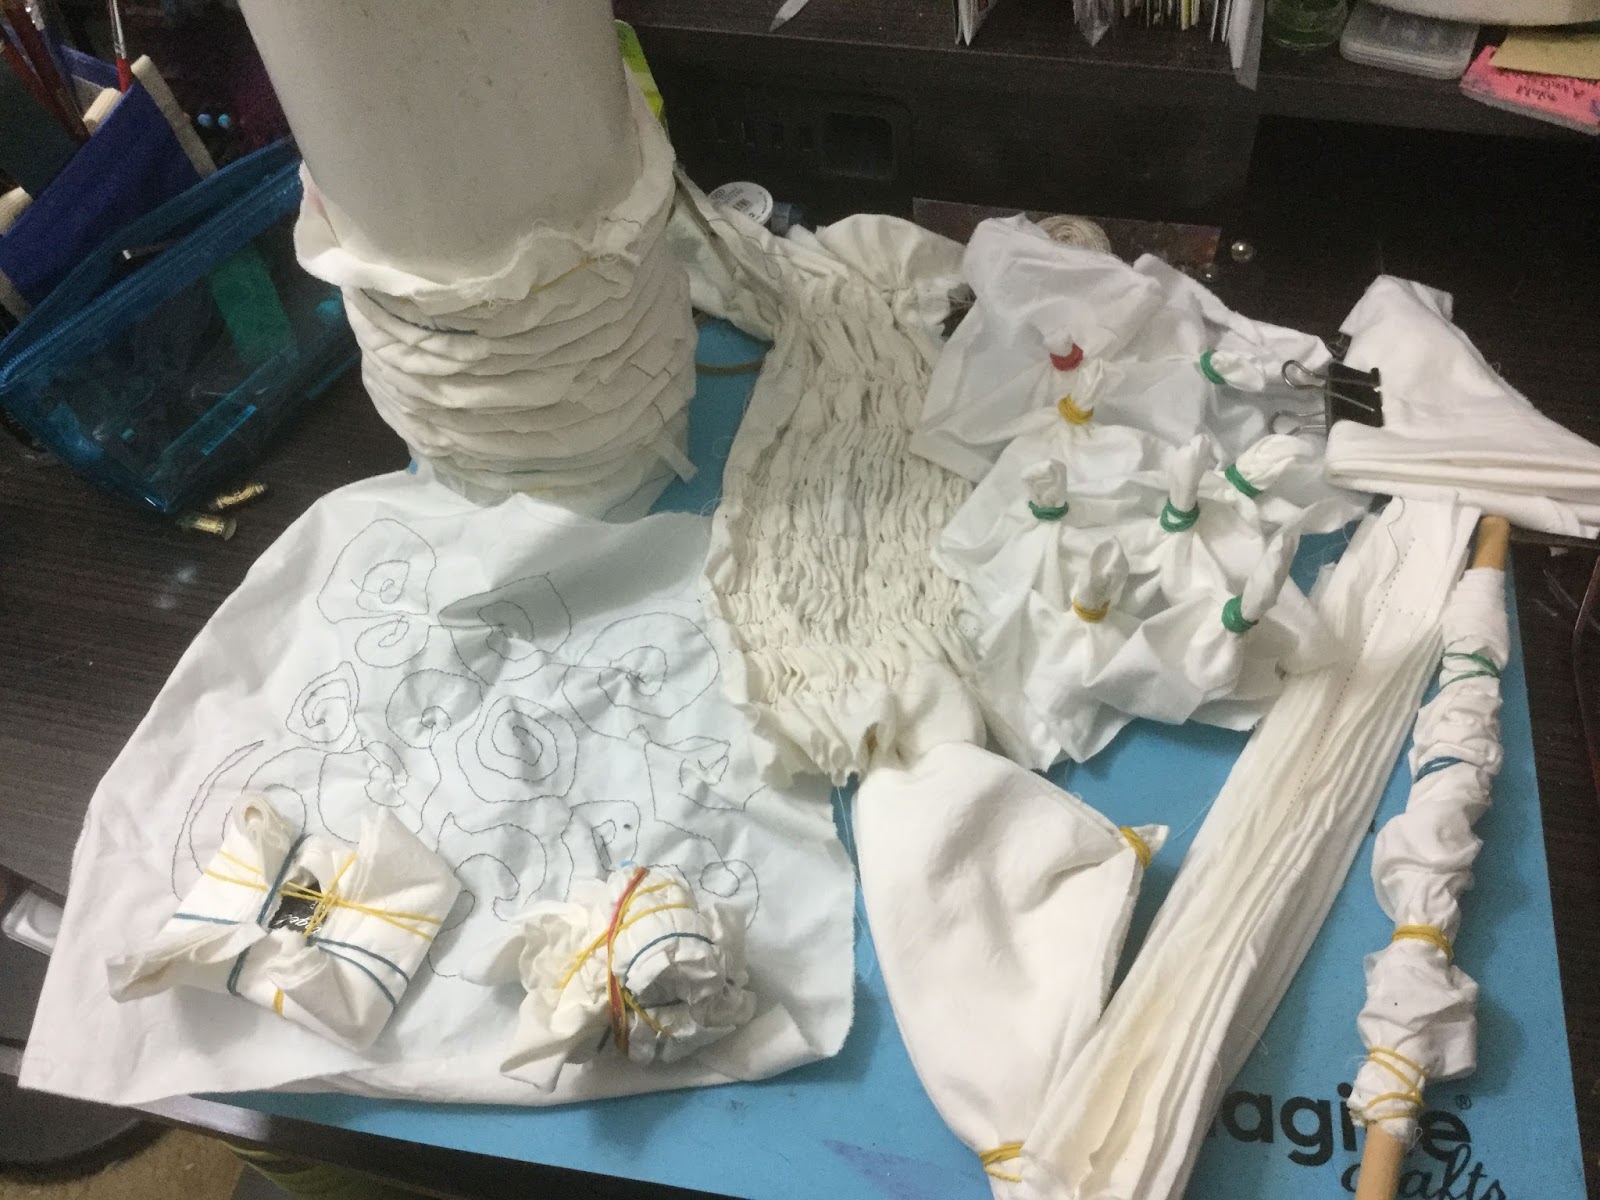
These are my shibori pieces ready to dye. I did several standard tie dye method with many rubber bands to make an over circular pattern as well a folded square with a bulldog clip. I also just scrunched a piece and tied it up with rubber bands. I also folded a piece of fabric in a square and rubber banded it and then folded another in a triangle and rubber banded the tips.
I also tried several using the tritik shibori method. I accordion folded fabric and hand stitched it ever half inch to an inch and created pleated materials. I also accordion folded another piece of fabric and then machine stitched down the center. I also tried to machine stitch a pattern to see what that would do.
I tried to arashi shibori methods. I did now on a fat pvc pipe and used rubber bands to scrunch the fabric together. I also used a dowel and rubber bands.
Module Two, chapter six, store fabric

This is my collection of store bought fabric. I had all but a few already in my fabric stash, but was able to pick up a few fat quarters on sale.
Sunday, December 25, 2016
Module two, Chapter five, paper monoprints

Monoprinting was fun. You can see some of the ghost prints turned out line too. After the first pull, I spread the glass with water for the second pull. You can see on the bottom, second from the left the difference to the original immediately to the left. On some of them I decided to use fabric for the second pull. I will include those in the examples for the next class. I used printing ink for silk screening and Golden's Carbon Black fluid acrylic paint. I also thought that I needed a few that would be darker so using a black paper, used golden's Zinc white to print. I wanted to make sure that I had a full array of tones.
Module Two, Chapter Five, Bleached paper

Module Two, Chap Five, Papers One

These were done on printer paper. Most were done using a cardboard box that I cut up in different shapes. I tried to use the drawings that I did to "interpret" the animal patterns. What I began to notice is that with each set, the designs got more stylized.
Sunday, December 18, 2016
Module Two, Chapter 4, Alligator Pattern

Module Two, Chapter 4, Zebra print

I started this (top left) on my ipad using procreate. I then moved it into photoshop to play with the different filters. I think this has a lot of potential.
Module two, Chapter 4, Snow Owl

I thought that the feather pattern of the snow owl created a very interesting effect. I also thought it would have some interesting possibilities for painting on fabric. I did two computer manipulated patterns too.
Module Two, Chapter 4, Jaguar print

Sunday, December 11, 2016
Module Two, Chapter Three, Animal Skins, Part 3

A and B were the original stitch layer (see previous post).
A.1) Went over scallop stitch with uniformly formed zigzag stitch to create a linear pattern.
B.1) Went over the gathering stitch with the triple straight stitch; it didn't add a lot of interest but could for another pattern perhaps.
Module Two, Chapter Three, Animal Skins, Part 2

As this was still a general experimental exercise, I used the base and created different variations.
A) working with the honeycomb base, I added some additional rows to create a darker tone and then a connecting line.
A.1 and A.2) Crisscrossed the line to create possible snake skin pattern
B, B.1, and B.2) Running Stitch base with Stitch #6 over it; not very interesting, but I did do a few more rows under it.
C) Stitch #6, then dropped the feed dogs, whip stitch
C.1) Stitch #6, then dropped the feed dogs, heavier whip stitch, and freeform zigzag in one row, connected
C.2) Stitch #6, then dropped the feed dogs, whip stitch, connected freeform zigzag to create spots in center; played with denser, and then gradually lighter stitching toward the right.
Subscribe to:
Posts (Atom)