Picture turned upside down. It is still a little wet at this stage, so a bit darker than actual.
I was worried about the puckering which can be caused by not enough stabilizer or uneven stitch density. I was able to block most of it out. The uneven sides were intentional. Life doesn't fit into a neat box.
Sunday, September 23, 2012
Garden at the end of Summer
Saturday, September 15, 2012
New piece started
I started this piece last week. I am working on some soluble with some wool roving. I am doing thread painting on top.
Friday, September 14, 2012
Onyx still looking for a home
Onyx is a two year old full bred husky. He has been with us for two months now and is still looking for a forever home. He is a special dog who needs special handling. He is very sweet and very smart, but needs an experienced dog owner who has the time to work with him. He can be fear aggressive and really needs someone who is willing to gain his trust as well as clearly be his pack leader. Although he was a handful when we first got him, he has now become an awesome dog who loves rough housing with our dog, Sunny.
Fiber Art Fusion Art Show
I have been a part of the Fiber Art Fusion group since it begin. This is my submission for our six annual show at The Art Place at Mountainview.
Friday, July 06, 2012
Meet Onyx - Needs a forever home!
Tuesday, June 19, 2012
Drawing day one
It was actually hard to post this drawing. I am soooo out of practice. I am going to work at a drawing a day and this is day one. For so many years I really did art everyday, but over the past few, I have let work and other commitments get in the way, until now I can't seem to do a little sketch. To try and keep me focused, I signed up for the sketchbook project. I will post more about it in day's to come.
Sunday, June 10, 2012
Vertical garden
Nasar and I took a class this weekend on making vertical gardens. I made two. They are so fun to make and I can't wait to hang them up. I will need to wait three weeks to hang them to allow the roots to take hold.
Sunday, April 15, 2012
Mojo needs a home
I started being a foster Mom for Mush Rescue, a local husky rescue group. This is Mojo. He was found at the end of March near Noonday creek. So far no one has claimed this amazing dog so Mush rescue was called to take him. Hopefully he will find the perfect home soon.
Sunday, April 08, 2012
Another fairy garden
This is another one that I made this weekend. The little house was purchased at an antique store in Ellijay. I made the bonsai tree myself.
Another fairy garden
This is another one that I made this weekend. The little house was purchased at an antique store in Ellijay. I made the bonsai tree myself.
Friday, April 06, 2012
Fairy Garden number Four
Here is Fairy garden number four. I want to Goodwill and got the wire container for $3. A trip next door to big lots for the coco liner for $2.50 came next. My friend Tammy had suggested that I try breaking a tile for the walkway as an alternative to the pebbles, so while at Goodwill I found a set of four white tiles for $2. I then went to Kelli Greens nursery. I spoke the wonderful gardener who works there and she told me bout some Elfin Thyme that she had growing in the back. I bought three of them for $3.75 each. It is on the left. I also used what I had left of the Irish moss. green's also sold the little fairy and the mushroom for $4.99 each. I added the small sand dollar and the small geode as well.
Thursday, April 05, 2012
Bonsai miniature with elf
Today I took the spruce that I had started pruning the other day and did a little more. I also started wiring one of the branches. I haven't decided on its final shape yet, so I wasn't too aggressive with the pruning. Next I did a bit of the roots. I couldn't find the right size container, so I uses one that was a bit big. This is probably just temporary until it finds it's way into a larger garden scene, but it is cute now. I added a farmer elf that I found in an antique store last weekend in Ellijay. It was a set for $6 and these are only a few of the pieces.
Tuesday, April 03, 2012
Second Fairy Garden
So I stopped by Pike's on the way home from work to fill in plants for the first garden and they had smaller fairy garden kits ($33), and I couldn't resist. I also checked out other plants that I thought might be appropriate and came up with a few. The two big splurges was for a golden carpet juniper which I can start training as a bonsai and another angel vine which was already trained into a circle. I finished it off with more Irish moss, some moss from my front yard, and Georgia blue speedwell (the pretty little flower in front). I almost forgot the Powys castle artemisia. I pruned it to be tree like and it turned out really cute. I am addicted. I have more stuff now to make another. I just need containers.
Miniature Fairy Garden
I was visiting Blue Ridge this weekend with my sister. We passes a cute little garden/floral store called Penelope's. Besides having a collection of breathtaking orchids, they also sold miniature fairy gardens. I had never seen them before and fell in love. They are so precious. The one they had set up was over $200 so I bought the kit and decided to make it myself. I bought the lavender tree from them as I wanted the scale. I also bought the Irish moss there. I also bought the angel vine from them to wrap around the arbor. I bought more Irish moss from Pike's (same price double the plant).
Sunday, March 11, 2012
Decolourant is fun!
Here is my first try with it, I bought a purple batik fat quarter from Karen's shop, in Jasper, Quilting on Main. Using a stencil, I applied the decolourant. I now need to let it dry then heat it to remove the color. I will post the results.
Sunday, February 26, 2012
Japanese Bead Embroidery, progress
I am still working on my phase four still. I have a month and a half to finish it. I still think it possible, but aim going to need to work a lot more than I did in February.
Saturday, January 14, 2012
Japanese Bead Embroidery, Phase Four, Day Four
Friday, January 13, 2012
Japanese bead Embroidery, Phase Four, Day 2
This is what I accomplished after day two of my Phase Four bead embroidery at the Japanese Embroidery Center in Atlanta. This is the Peacock Mat. For phase four there were two choices, this one and the floral melody purse. Both are amazing but I decided that I could get more use out of the mat. Now, I want to do the floral melody purse also. Phase four is a pre-requisite for Phase five, which is the highest level in Japanese bead embroidery. This is so much fun, but my back is screaming.
Wednesday, January 04, 2012
Bead Embroidery
Happy new year! I am really committing to not allow my job stop me from making art regularly. This is a piece that I actually finished this past summer but really wanted to share. It was a kit from Ann Benson's website. I really wanted to see if there were any cool techniques. The bead embroidery was not anything new, but she has you work on paper that is fused to the stabilizer. The pattern is printed on the paper. This, I thought, was a cool idea. It also has the directions to add the clasp type handle which I wanted to learn.
Wednesday, December 28, 2011
Beaded necklace
My sister started beading this year and loves it. She came up to the mountains with me in October and we had a beading marathon. One of the things we did was each buy the same kit and make it. We decided on this one from Melanie Potter called Marsha.
French knots
Here is a sample of French knots only. It was fun and easy, but net time I want to do it with a plan or design in mind from the beginning.
Monday, December 26, 2011
Couched stitch sample
I am trying to create multiple sample pieces that explore a single stitch. This one only uses crouching, during the coming year I hope to do a few a month. Sharon boggin's Take a Stitch Tuesday's is a great source for inspiration. Many of the threads used in this piece were hand dyed in New Mexico.
Saturday, December 24, 2011
Fiber forum piece, contemporary embroidery
Japanese bead embroidery, phase one
This is phase one of the Japanese bead embroidery. It turns in to glass case. The piece is pretty basic, but turns out nice. The point is to learn the structure of Jen and how it differs from other forms of bead embroidery.
Japanese Bead Embroidery, phase three
I haven't posted in almost a year. I mentioned to someone at work that I had a blog, so I decided that I had better get back to it. I am going to try and post some of the work from the last year. This is my phase three certification project for Japanese Bead embroidery. I plan on staring on phase four in January. This pieces had tons of couched lines (which needed to be straight), but the really fun part of this was the three dimensional aspect of the poppies.
Wednesday, February 23, 2011
Complex Stitched Design Three, Chapter Eight

Layer one: sheer machine stitched down
Complex Stitched Design Two, Chapter Eight

OKAY! I really tried to go complex on this one! I used kunin felt as the base with another layer of kunin felt pressed together using an embellisher. I then "created" a square of fabric with ribbon yarn using water soluble and machine stitching. This was then treated as a layer which is machine stitched down. The yellow layer is then padded with batting. The yellow felt triangles where added last.
Complex Stitched Design One, Chapter Eight

I really wanted to start simple with this chapter's assignments. My base layer is only machine stitching. I bourt a new computerized machine the year before and really haven't used the some of the special stitches "muscle" yet. I programmed a stitch size that I thought would be appropriate for the size and density. For the top layer, I purposely choose a computerized stitch what would work with instead of fight the satin fabric's tendency to fray.
Stitch Design Six, Chapter Seven

I really wanted to add a fourth layer to one of these samples; however, when it came time to add a top layer, I decided against it.
Monday, July 05, 2010
Japanese Embroidery, Phase Two WIP
Japanese Embroidery, Phase One complete

Bead Embroidery

Monday, June 14, 2010
Monday, June 07, 2010
Stitched Design Three, Chapter Seven

Stitched Design Two, Chapter Seven

Stitched Design One, Chapter Seven

Fused Designs, Set Two, Chapter Six

Fused Designs, Set One, Chapter Six

Tuesday, June 01, 2010
Module One, Chapter 6, Bonded Fabric
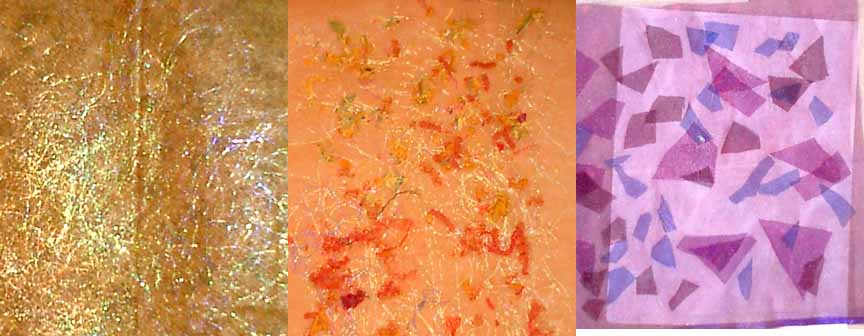
Far left fabric is a sandwich of light blue nylon tulle sprinkled with Bo-nash powder with small scraps from my paper cutting exercises. I didn't like the white spots created when the bonding powder melted so I took some gold foil and foiled the piece too.The right fabric is two pieces of yellow nylon tulle with snippets of dmc stranded thread and gold thread held together with bonding powder.
Middle left piece is painted wonder-under on yellow tulle.
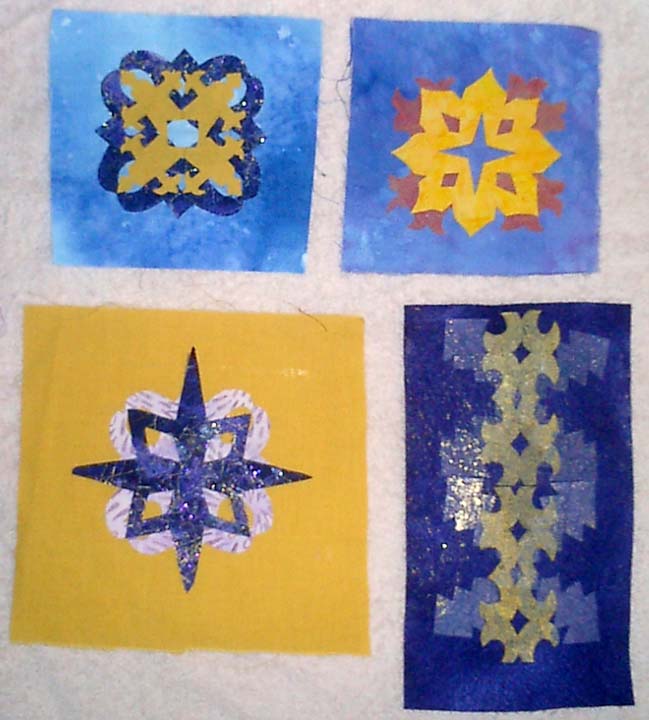
Lower left bonded fabric was created with a bottom layer of commercial purple fabric. On this I ironed some lightly painted wonder-under and then added a layer of snippets of blues and purples, as well as gold thread. I then added more bonding powder as the snippet layer was so thick, and topped it with a piece of nylon sheer. When I actually used this piece in my fused sample and again in my stitched sample, I used the embellisher to distress the sheer and remove the "high gloss".
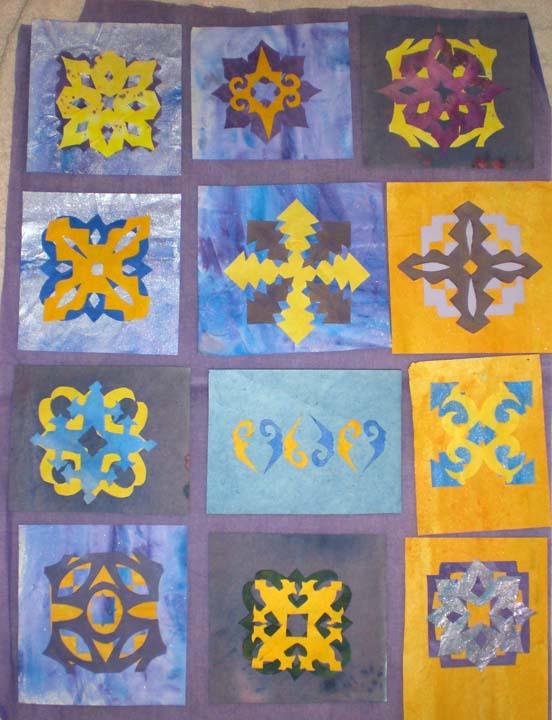
The far left piece is a commercial print fabric with angelina fused with wonderunder. I then addded a layer of sheer on top.Middle layer is a heavier netting with snippets and covered with tulle.
On the far right, is two layers of sheers with snippets of other sheers sandwiched between them.
Module One, Chapter 5, Painted Fabric Two
Here is a set of my painted fabric. I really like working with tone on tone and realized that the majority of my fabric was orange/yellow on orange/yellow or blue/purple on blue/purple! I made several new fabrics with the compliments. I really liked them.I also experimented with different ways to color the fabric. I came close to using thickened fabric dyes, but decided that it would not be "learning" to use ways that I was most familiar with and so I used several Golden Fluid acrylic paints, Lumerie (another acrylic), Stewart Gill acrylic, and Dye-na-Flow. I really didn't like the Dye-na-Flow as it didn't keep the detail. I also tried Fabrico stamp ink. It advertises as being color fast on fabric. Both of the bottom two fabrics were done with these inks. I think they were not only the easiest to work with but also kept the most defined edges.
Module One, Chapter Five, Fabric Collection

Here is the beginning of my fabric collection. Most of the cottons I hand dyed for this module. I also dyed cottons, silk, burlap, and stranded floss together. The burlap didn't take the dye well as it had been pre-treated (I bought it off the remnants rack at the fabric store) and has blotches, but these can probably be worked into the design. The upper left piece is a gorgeous woven wool. Since this time, I have shopped for more fabric and purchased yellow, purple and blue tulle (nylon) and several colored nylon sheers.
Painted Fabric, Set One, Chapter Five

Colored Paper Cut Outs Set Two
Here is another set of my paired designs. I really do like them. I think the biggest weakness is that there isn't a lot of visual variations between the designs. They are all, except for third row middle, a centered motif, similar to a quilt square. As I develop designs, I really want to find ways to integrate the entire space. On the stitched sample that I worked on this weekend, I began to work with the background more to make it more of a part of the design, not just a pretty pattern slapped onto any old background. Suggestions???Paper Cut Outs Sketchbook one


Colored Paper Cut Outs Set One

Black Paper Cut Outs 3, Module One, Chapter Four

Black Paper Cut Outs 2, Module One, Chapter Four
These are some of the black paper cut outs. I REALLY enjoyed this exercise and could have spent months just making them. I am glad I finally moved on as the next ones were even better.


